Saturday, May 30, 2020

Canvas Life Cycle Handler to change url Dynamically and provide authorization information via the signed Request

You can control your app lifecycle by providing an implementation of the Canvas.CanvasLifecycleHandler Apex interface that Salesforce can use.
The Apex Canvas.CanvasLifecycleHandler interface provides methods and callbacks for customizing app lifecycle behavior. Salesforce will use your implementation at runtime to let you run custom code. Use the following steps to create an implementation of the Canvas.CanvasLifecycleHandler interface.

  1. From Setup, enter Apex Classes in the Quick Find box, then select Apex Classes.
  2. Click New to create a Apex class.
  3. Create an Apex class that implements the Canvas.CanvasLifecycleHandler interface. You must implement the excludeContextTypes() and onRender() methods. Here’s a template example:public class


MyCanvasLifecycleHandler implements Canvas.CanvasLifecycleHandler {

    public Set<Canvas.ContextTypeEnum> excludeContextTypes()
{ Set<Canvas.ContextTypeEnum> excluded = new Set<Canvas.ContextTypeEnum>(); // Code goes here to add items to excluded list // that should be excluded from Context data return excluded; }

 public void onRender(Canvas.RenderContext renderContext) { // Code goes here to customize behavior when the app is rendered } }


    >> After you’ve finished adding your code, save the Apex class
    >> Optionally test your implementation by using the Canvas.Test class
   >>  To let Salesforce know which implementation to use for your app, associate your Apex class with your app.

To modify the default behavior of the signed request, you need to provide an Apex class that implements Canvas.CanvasLifecycleHandler.onRender() and associate this class with your canvas app. In your onRender() implementation, you can control app behavior with custom code.
Salesforce calls your implementation of onRender() just before your app is rendered. Current context information is passed to this method in the Canvas.RenderContext parameter.
In your onRender() implementation, you can retrieve the following context information.
  • Application context data, such as the canvas app name, URL, version, and namespace.
  • Environment context data, such as the display location and sublocation, object field names, and custom parameters.
You can set the following context information.
  • The portion of the canvas app URL after the app domain.
  • The list of object fields for which Salesforce will return Record context data if the canvas app appears on an object page. One way a canvas app can appear on an object page is if the canvas app appears on a Visualforce page through the use of the <apex:canvasApp> component and that Visualforce page is associated with an object.
  • The custom parameters that are passed to the canvas app.
You can also use Canvas.CanvasRenderException to present an error message to the user in the Salesforce by throwing a Canvas.CanvasRenderException.
Here’s an example onRender() implementation that:
  • Checks the app version information and, if the version is unsupported, throws a CanvasRenderException.
  • Overrides the current canvas app URL, appending ‘/alternatePath’ to the domain portion of the original URL.
  • Sets the list of object fields to include Name, BillingAddress, and YearStarted, anticipating that the canvas app will appear on the Account page.
  • Overrides the set of custom parameters by adding a new ‘newCustomParam’ parameter. Note that the current set of parameters is first retrieved and cached locally. The new parameter is added to the cached list to ensure that you don’t lose the current set of custom parameters when you call setParametersAsJSON().

  • public void onRender(Canvas.RenderContext renderContext) {

    // Get the Application and Environment context from the RenderContext
    Canvas.ApplicationContext app = renderContext.getApplicationContext();
    Canvas.EnvironmentContext env = renderContext.getEnvironmentContext();

    // Check the application version
    Double currentVersion = Double.valueOf(app.getVersion());
    if (currentVersion <= 5){
        // Versions lower than 5 are no longer supported in this example
        throw new Canvas.CanvasRenderException('Error: Versions earlier than 5 are no longer supported.');
    }

    // Override app URL, replacing portion after domain with '/alternatePath'
    app.setCanvasUrlPath('/alternatePath');

    // Add Name, BillingAddress and YearStarted to fields 
    // (assumes we'll run from a component on the Account detail page)
    Set<String> fields = new Set<String>{'Name','BillingAddress','YearStarted'};
    env.addEntityFields(fields);

    // Add a new custom param to the set of custom params
    // First, get the current custom params
    Map<String, Object> previousParams = 
        (Map<String, Object>) JSON.deserializeUntyped(env.getParametersAsJSON());
    // Add a 'newCustomParam' to our Map
    previousParams.put('newCustomParam','newValue');
    // Now, replace the parameters
    env.setParametersAsJSON(JSON.serialize(previousParams));
}
Friday, May 8, 2020

Generate a Certificate file and Private Key


   Generate a Certificate file and Private Key

An example of how to create a certificate:


1.   keytool -keysize 2048 -genkey -alias mycert -keyalg RSA -keystore ./mycert.jks

2.   keytool -importkeystore -srckeystore mycert.jks -destkeystore mycert.p12 -deststoretype PKCS12

3.  openssl pkcs12 -in mycert.p12 -out key.pem -nocerts –nodes

4.  keytool -export -alias mycert -file mycert.crt -keystore mycert.jks -rfc


If you don't have openssl installed click on below link and download now.


You will get one executable file, click on it and follow the wizard steps until you finish it.


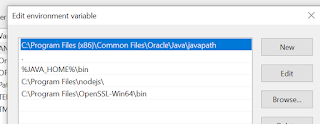
Add openssl to your environment variables.My system path settings are as below. Follow the same in your system as well.

System variable settings:


bin folder path should be given in the environment path variable.


User variable settings.


OPENSSL_CONF=yourpath/openssl.cfg

Once these settings are done, go back to the cmd and type openssl. You should see >OpenSSL as output. If the settings are incorrect, you will get error message.

KeyTool.

Keytool is part of your Jave JDK. go to the path of keytool and run the keytool commands, you don't need to do anything special for keytool.


c


Monday, April 27, 2020

pubsub in LWC

If we remember the Aura framework, to communicate between two unknown components we used the Application event. There is no such event in lwc instead an alternate is pubsub module.

copy the pubsub code from the below link and create a lwc service component with the name lwc.

https://github.com/trailheadapps/lwc-recipes/blob/master/force-app/main/default/lwc/pubsub/pubsub.js


From the above module, keep a special eye on registerListener,fireEvent and unregisterListener functions.

export {
    registerListener,
    unregisterListener,
    unregisterAllListeners,
    fireEvent
};


In the publisher component we use fireEvent and from the subscriber component, we use registerListener and unregisterListener. Both publisher and subscriber share these functions and hence we are calling it as pubsub module.

Below is the simple and easy code to understand this concept.

publishercmp.html

<template>
    <lightning-card  title="I'm a publisher">
        <lightning-layout>
           <lightning-layout-item padding="around-small">
            <lightning-button label="Publisher" onclick={fireevent}></lightning-button>
           </lightning-layout-item>
       </lightning-layout>
      
    </lightning-card>
    
</template>

publishercmp.js

import { LightningElementwire } from 'lwc';
import {fireEventfrom 'c/pubsub';
import { CurrentPageReference } from 'lightning/navigation';

export default class MyPublisher extends LightningElement {

@wire(CurrentPageReferencepageRef;

fireevent(){
 fireEvent(this.pageRef"supplyme","from publisher");
}
}


subscriber.html

<template>
    <lightning-card title="I'm a Subscriber">
        <lightning-layout>
            <lightning-layout-item>
                {datafrompub}
            </lightning-layout-item>
        </lightning-layout>
    </lightning-card>
</template>

subscriber.js

import { LightningElementwire } from 'lwc';
import { CurrentPageReference } from 'lightning/navigation';
import {registerListener,unregisterAllListenersfrom 'c/pubsub';

export default class MySubscriber extends LightningElement {

    @wire(CurrentPageReferencepageRef;
    datafrompub;

    connectedCallback(){ registerListener("details",this.getdata,this);}

    disconnectedCallback(){ unregisterAllListeners(this);}

    getdata(pubdata){

    this.datafrompub=pubdata;

    }

}


Here is the output after clicking the button in the publisher component.


Thanks.


Loadstyle, Loadscript in LWC

Import static resources from the @salesforce/resourceUrl scoped module. Static resources can be archives (such as .zip and .jar files), images, style sheets, JavaScript, and other files.

Below is the sample example for the same:

import { LightningElement } from 'lwc';
import img  from '@salesforce/resourceUrl/benioff';
export default class Singletonex extends LightningElement {

imagebenioff=img;
}
}
<template>
<button onclick={checkfunctions} class="button">custom script from different component </button>
    <div class="slds-m-around_medium">
    <img src={imagebenioff}>
    </div>
</template>


Download any pic which can be archives (such as .zip and .jar files), images, style sheets, JavaScript, and other files. Here I downloaded the Mark Benioff pic to remember the boss of Salesforce :)

Working with an image is straight forward, how about custom CSS and external libraries?

To do this first include the below statement and then include the path of the resource which you want to use.

import {loadStyle,loadScriptfrom 'lightning/platformResourceLoader';

To map this with your existing aura knowledge loadStyle and loadScripts are as similar as below code.

<aura:component>
    <ltng:require
        styles="{!$Resource.jsLibraries  + '/styles/jsMyStyles.css'}"
        scripts="{!$Resource.jsLibraries + '/jsLibOne.js'}"
        afterScriptsLoaded="{!c.scriptsLoaded}" />
</aura:component>
Here loadStyle and loadScript are promises, use promise notations to utilize these resources.

Below is the simple defined example to understand this concept better.

markup:

<template>

    <button onclick={checkfunctions} class="button">custom script from different component </button>
    <div class="slds-m-around_medium">
    <img src={imagebenioff}>
    </div>
</template>

import { LightningElement } from 'lwc';
import img  from '@salesforce/resourceUrl/benioff';
import {loadStyle,loadScriptfrom 'lightning/platformResourceLoader';

import jsurl from '@salesforce/resourceUrl/customjs';
import storageresource from '@salesforce/resourceUrl/storage';
import cssex  from '@salesforce/resourceUrl/customcss';

export default class Singletonex extends LightningElement {

imagebenioff=img;
connectedCallback(){

    Promise.all([loadScript(this,storageresource),loadScript(this,jsurl),
    loadStyle(this,cssex)]).then().catch();

}

checkfunctions(){
    console.log("@@@@@@ Fruits @@@@@@@@@"+_map.getFruits());
    
    console.log("@@@@@@ shared component counter @@@@@@@@@"+counter.increment());
    console.log("@@@@@@ shared component counter@@@@@@@@@"+counter.getValue());


}


}


Below are the resources to include in the static resources.

customcss (ensure that to save it with .css extension)

.button {
  background-color: #4CAF50;
  border: none;
  color: white;
  padding: 15px 32px;
  text-align: center;
  text-decoration: none;
  display: inline-block;
  font-size: 16px;
  margin: 4px 2px;
  cursor: pointer;
}


customjs (ensure that to save it with .js extension)

window._map = (function() {
    var fruits = ["Mango", "Apple", "Banana", "Graps", "Pineapple"];
    return {
        getFruits: function() {
            return fruits;
        }
    };
}());

storagejs (ensure that to save it with .js extension)


window.counter = (function(){

    var value = 0; // private

    return { //public API
       
        increment: function() {
            value = value + 1;
            return value;
        },

        getValue: function() {

            return value;
        }
       
    };

}());

The above storage code acts as a singleton pattern. Results are persistent across multiple components on the same page. If more than one component are using same code on the same page. The state will be carried forward.  Ex: In component 1 when you click the button count will be 1 and when you click the similar button to call the same code in the other component, the count will be carried forward. Now the count will be 2 and so on.....


Saturday, April 25, 2020

Call apex from LWC.


We know that we can import modules into the LWC javascript like "import { LightningElement,track,api } from 'lwc';"

Lightning web components can also import methods from Apex classes. The imported methods are functions that the component can call either via @wire or imperatively.

I divided into two categories they are wire and imperative.

Category one :  via wire.

>> We can wire a property to the method which you imported from apex class.
 @wire(getContactList) contacts;

Here we are wiring a function to property contact. Now, this property contains two sets of data. one is data ex:"contacts.data" another one error ex: is "contacts.error".

In the markup, we can access data and error as below.

<template if:true={contacts.data}>
                <template for:each={contacts.data} for:item="contact">
                    <p key={contact.Id}>{contact.Name}</p>
                </template>
            </template>
            <template if:true={contacts.error}>
                <c-error-panel errors={contacts.error}></c-error-panel>
            </template>
>> We can wire a function to the method which you imported from apex class.
@wire(getContactList)
    wiredContacts({ error, data }) {
        if (data) {
            this.contacts = data;
            this.error = undefined;
        } else if (error) {
            this.error = error;
            this.contacts = undefined;
        }
    }
From the mark up only change is, instead of referring it like {contacts.data}, we need to refer {contacts}.

Example:
                <template for:each={contacts} for:item="contact">
                    <p key={contact.Id}>{contact.Name}</p>
                </template>
            </template>


Category two:  Call an Apex Method Imperatively.


Apex methods that are annotated with cacheable=true are restricted to read-only operations. They perform better, so use cacheable methods when possible. You can access cacheable Apex methods with @wire or call them imperatively. Call a method imperatively when you must control when the invocation occurs (for example, in response to clicking a button, or to delay loading to outside the critical path). When you call a method imperatively, you receive only a single response. Compare this behavior with @wire, which delegates control to the framework and results in a stream of values being provisioned. Whether you use @wire or call a method imperatively, the data is stored in the Lightning Data Service cache.

In the following scenarios, you must call an Apex method imperatively as opposed to using @wire.

To call a method that isn’t annotated with cacheable=true, which includes any method that inserts, updates, or deletes data.
To control when the invocation occurs.
To work with objects that aren’t supported by User Interface API, like Task and Event.

To call a method from an ES6 module that doesn’t extend LightningElement

upon clicking the button below method will get call which in turn call the getContactList. unlike wire mechanism, here we need to use promises like .then and .catch.
handleLoad() {
        getContactList()
            .then(result => {
                this.contacts = result;
            })
            .catch(error => {
                this.error = error;
            });
    }

You don't need to use @wire here.


To pass params you just need to mention params with in the brackets of the method.

getContactList({ amount: this.amount });