Saturday, April 25, 2020

Call apex from LWC.


We know that we can import modules into the LWC javascript like "import { LightningElement,track,api } from 'lwc';"

Lightning web components can also import methods from Apex classes. The imported methods are functions that the component can call either via @wire or imperatively.

I divided into two categories they are wire and imperative.

Category one :  via wire.

>> We can wire a property to the method which you imported from apex class.
 @wire(getContactList) contacts;

Here we are wiring a function to property contact. Now, this property contains two sets of data. one is data ex:"contacts.data" another one error ex: is "contacts.error".

In the markup, we can access data and error as below.

<template if:true={contacts.data}>
                <template for:each={contacts.data} for:item="contact">
                    <p key={contact.Id}>{contact.Name}</p>
                </template>
            </template>
            <template if:true={contacts.error}>
                <c-error-panel errors={contacts.error}></c-error-panel>
            </template>
>> We can wire a function to the method which you imported from apex class.
@wire(getContactList)
    wiredContacts({ error, data }) {
        if (data) {
            this.contacts = data;
            this.error = undefined;
        } else if (error) {
            this.error = error;
            this.contacts = undefined;
        }
    }
From the mark up only change is, instead of referring it like {contacts.data}, we need to refer {contacts}.

Example:
                <template for:each={contacts} for:item="contact">
                    <p key={contact.Id}>{contact.Name}</p>
                </template>
            </template>


Category two:  Call an Apex Method Imperatively.


Apex methods that are annotated with cacheable=true are restricted to read-only operations. They perform better, so use cacheable methods when possible. You can access cacheable Apex methods with @wire or call them imperatively. Call a method imperatively when you must control when the invocation occurs (for example, in response to clicking a button, or to delay loading to outside the critical path). When you call a method imperatively, you receive only a single response. Compare this behavior with @wire, which delegates control to the framework and results in a stream of values being provisioned. Whether you use @wire or call a method imperatively, the data is stored in the Lightning Data Service cache.

In the following scenarios, you must call an Apex method imperatively as opposed to using @wire.

To call a method that isn’t annotated with cacheable=true, which includes any method that inserts, updates, or deletes data.
To control when the invocation occurs.
To work with objects that aren’t supported by User Interface API, like Task and Event.

To call a method from an ES6 module that doesn’t extend LightningElement

upon clicking the button below method will get call which in turn call the getContactList. unlike wire mechanism, here we need to use promises like .then and .catch.
handleLoad() {
        getContactList()
            .then(result => {
                this.contacts = result;
            })
            .catch(error => {
                this.error = error;
            });
    }

You don't need to use @wire here.


To pass params you just need to mention params with in the brackets of the method.

getContactList({ amount: this.amount });
Monday, April 20, 2020

LWC Child to parent, grand parent communication with bubble event.

Create and Dispatch Events

Create and dispatch events in a component’s JavaScript class. To create an event, use the constructor. To dispatch an event, call the EventTarget.dispatchEvent() method.
The CustomEvent() the constructor has one required parameter, which is a string indicating the event type. As a component author, you name the event type when you create the event. You can use any string as your event type. However, we recommend that you confirm with the DOM event standard.

Communicate from child to grand parent.
Child.html
<template>
      <button onclick={updateparent} >Update Prnt and Grand Parent</button>
  
</template>

Child.js
import { LightningElement,apifrom 'lwc';

export default class Child extends LightningElement {

    @api recordData;

    updateparent(){
    this.dispatchEvent(new CustomEvent('updateme',
    {bubbles: true,composed: true,detail:"John"}

     ));
    }

  
}

parent.html
<template>

<my-child record-data={objdata}  onupdateme={prntfun}></my-child>
<
</template>

parent.js
import { LightningElementtrackfrom 'lwc';

export default class Prnt extends LightningElement {


@track objdata=[

{"firstname":"Mark""lastname":"Paul"
"Picture":"https://techcrunch.com/wp-content/uploads/2019/08/Screen-Shot-2019-08-29-at-3.02.46-PM.png?w=1390&crop=1"     },
{"firstname":"Jennie""lastname":"Paul",
 "Picture":"https://techcrunch.com/wp-content/uploads/2019/08/Screen-Shot-2019-08-29-at-3.02.46-PM.png?w=1390&crop=1"     }
];


prntfun(event){

    console.log("###evnt detail####"+event.detail)

   this.objdata[0].lastname=event.detail;


}
}

grandParent.html
<template>
   
   <my-prnt  onupdateme={gpfun}> ></my-prnt>
  
</template>

when you dispacth the event with bubbles:true and composed:true, you can use the same syntax as what you used in the parent component. Notice that onupdateme={gpfun}(Grand parent) and onupdateme={prntfun}(Parent) both are same in parent and grandparent.The only change is the function name, rest everything is same.
grandParent.js
import { LightningElementfrom 'lwc';

export default class Gp extends LightningElement {

    gpfun(){

  console.log("#####Grand parent is called$$$$$$$");

    }

}

Before clicking the button the output is as below.


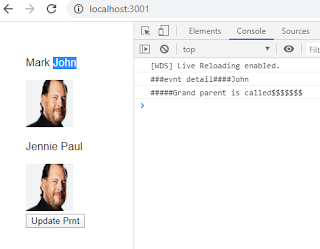
Now after clicking "Update Prnt" , the Name of the Mark paul changes to Mark John, this updation is being done in the parent and passing back the data back to the child.

Even though we need not to use @track from the spring 20 release, there is one place that you need to use that is updating the fields of the objects. This example is the perfect suite of when you need to use @track. If you remove @track in the parent component child component will not reflect the name "John".
Below is the output which explains both child to parent and child to the grandparent. This approach will bubble up to the dom element until it reaches the first invocation of the dom hierarchy.


Notice Grand parent is called is basically coming from the grand parent. Initiation taking place from the child web component.
Thanks !


Slots in LWC

Add a slot to a component’s HTML file so a parent component can pass markup into the component. A component can have zero or more slots.
A slot is a placeholder for markup that a parent component passes into a component’s body. 
To define a slot in markup, use the <slot> tag, which has an optional name attribute.
Below analogy between aura components and web components would give a clear picture of slots.

In the aura component, you used facets and body attribute to received data in the component body and now we are using slots to get it done.
In the below code we placed the content in the body of a child but to see the output we need to specify {!v.body} in the markup or you need to use body attribute in the javascript and parse it and supply it to the markup.
Parent cmp: 
<aura:application >
    <!--no logic in any of the bundle files -->
    <c:childbody >
        Parent data 1..
    </c:childbody>
</aura:application>
childbody cmp:
<aura:component >
    <!--no logic in any of the bundle files -->
{!v.body}
</aura:component>
Below code explains Slots of web components.
Parent webcmp:
<template>
  <!-- I dont have any business logic in the javascript, so ignoring it-->

  <my-childslot>
   <p>From the parent, we are passing data </p>

   <span slot="f1">Parent span </span>

   <div slot="f2">Parent f2 span </div>
  </my-childslot>

</template>

childbody.html webcmp:
<template>

<slot></slot>

<b><slot name="f1">   </slot> </b>
<h1><slot name="f2">   </slot> </h1>

</template>

childbody.js webcmp
import { LightningElementtrackfrom 'lwc';

export default class Childslot extends LightningElement {
    renderedCallback(){
   // Below line will not work as span element is not there in its template
   // console.log("$$$span query selector$$$$"+this.template.querySelector('span').innerHTML);
    
   //Below code works by removing template.
   console.log("$$$span query selector$$$$"+this.querySelector('span').innerHTML);

    }

}

The output of web component as follows:
To access the elements passed into the childbody, you need to use syntax as below. Note you should not use this.template while accessing the elements passed via slot.
this.querySelector('anyelement')

Service components, Arrow functions,map,reduce,find,filter,promises with simple code.

This example is to explain some of the essentials of Javascript in the LWC. Once you run it, you will get a more clear understanding of it. Primarily I thought of explaining Service components(helper in aura), Arrow functions , map, reduce, find, filter, promises with a basic calculator app.

Step 1: Create a Folder with the name calci and followed by calci.html,calci.js,calci.css.


Step 2: Create a file with math.js under the same folder.

The Below code is self-explanatory: converted the traditional Javascript to arrow functions. 

/*
equivalent traditonal javascript  code
export let add=function(x,y) {return x+y;}
export let sub=function(x,y) {return x-y;}
export let div=function(x,y) {return x%y;}
export let mul=function(x,y) {return x*y;} */

/*Converted to Arrow functions */

export let add=(x,y=> x+y;

export let sub=(x,y=> x-y;

export let div=(x,y=> x%y;

export let mul=(x,y=> x*y;


Step 3: copy below code in calci.html markup

<template>

First Number : <input onchange={handler} name="fn" /> <br/>

Second Number : <input onchange={handler} name="sn" /> <br/>

{finalnumber} <br/>


<div class="btn-group">
    <button onclick={add}>Add</button>
    <button onclick={sub}>Sub</button>
    <button onclick={mul}>Mul</button>
    <button onclick={div}>Div</button>
  </div>

  <br/>

  <div class="btn-group">
    <button onclick={find}>Find</button>
    <button onclick={filter}>Filter</button>
    <button onclick={map}>Map</button>
    <button onclick={reduce}>Reduce</button>
    <button onclick={promise}>Promise</button>
  </div>


</template>

Step 4: copy below code in  calci.js 

import { LightningElement } from 'lwc';
import { add,sub,mul,div } from './math';

export default class Calci extends LightningElement {

  fn;
  sn;
  finalnumber;

  arry=[];

    handler(event){
        let nam=event.target.name;
        if(nam==="fn"){
            this.fn=event.target.value
        }
            else if(nam==="sn"){
                this.sn=event.target.value;
            }
 }

    add(){
    let x=`Additon of two numbers (${this.fn} nd ${this.sn}) is :`;
    this.finalnumber='';
    this.finalnumber=add(parseInt(this.fn),parseInt(this.sn));

    this.arry.push(this.finalnumber);

    this.finalnumber=x+this.finalnumber;

    console.log("####this.arry######"+this.arry);

    }

    sub(){ 
        let x=`Sub of two numbers (${this.fn} nd ${this.sn}) is :`;
        this.finalnumber='';
        this.finalnumber=sub(parseInt(this.fn),parseInt(this.sn));
    
        this.arry.push(this.finalnumber);
    
        this.finalnumber=x+this.finalnumber;
    
        console.log("####this.arry######"+this.arry);
    
    
        }

     mul(){
        let x=`Mul of two numbers (${this.fn} nd ${this.sn}) is :`;
        this.finalnumber='';
        this.finalnumber=mul(parseInt(this.fn),parseInt(this.sn));
    
        this.arry.push(this.finalnumber);
    
        this.finalnumber=x+this.finalnumber;
    
        console.log("####this.arry######"+this.arry);
    

     }   

     div(){

        let x=`Div of two numbers (${this.fn} nd ${this.sn}) is :`;
        this.finalnumber='';
        this.finalnumber=div(parseInt(this.fn),parseInt(this.sn));
    
        this.arry.push(this.finalnumber);
    
        this.finalnumber=x+this.finalnumber;
    
        console.log("####this.arry######"+this.arry);
    

     }

     find(){
        console.log("####this.arry######"+this.arry);

        if(this.arry){let elment=this.arry.find(result=>result>200);

        console.log("####elment from find function######"+elment);
        console.log("####elment typeof######"+typeof elment);

     }

     filter(){

        if(this.arry){let elment=this.arry.filter(result=>result>200);console.log("####elment from filter function######"+elment);
            console.log("####elment typeof######"+typeof elment);}
    
     }

     map(){
        if(this.arry){let elment=this.arry.map(result=>result*10);
    
            console.log("####elment from Map function######"+elment);
            console.log("####elment typeof######"+typeof elment);
    
            }}

     reduce(){

        if(this.arry){ let elment=this.arry.reduce((total,result)=>total+result);
    
            console.log("####elment from Reduce function######"+elment);
            console.log("####elment typeof######"+typeof elment);
    }

     promise(){
        const URL = 'https://th-apex-http-callout.herokuapp.com/animals';
        const getSessions = () => fetch(URL,{
            mode: 'no-cors' // 'cors' by default
          })
        .then(response => {
          if (!response.ok) {
            throw new Error('No response from server');
          }
          return response.json();
        })
        .then(result => {
          let sessions = result.data;
          return sessions;
        }).catch(err=>err


            );
    
        console.log("Promise explained: Data from server #########: "+JSON.stringify(getSessions()));
    
     }

}

Step 5:copy below code in calci.css

.btn-group button {
    background-color#4CAF50/* Green background */
    border1px solid green/* Green border */
    colorwhite/* White text */
    padding10px 24px/* Some padding */
    cursorpointer/* Pointer/hand icon */
    floatleft/* Float the buttons side by side */
  }
  
  .btn-group button:not(:last-child) {
    border-rightnone/* Prevent double borders */
  }
  
  /* Clear floats (clearfix hack) */
  .btn-group:after {
    content"";
    clearboth;
    displaytable;
  }
  
  /* Add a background color on hover */
  .btn-group button:hover {
    background-color#3e8e41;
  }

And finally, place calci component in any of the container like aura application or in localhost. The output of the code looks as below.


Click on Add, sub, Mul and Div for basic arithmetic operations. Results of these operations stored in the array(arry) and on these array elements we performed map,find, filter and reduce functions(check in the browser console for the results) to explain how these important functions works.

Thanks

Monday, April 13, 2020

Push lwc to Heroku and local host

Download your Java JDK:

Since oracle is asking to signup to download the JDK, you may use the below website to download JDK without signup.

https://www.malavida.com/en/soft/java-jdk/download

Set your JAVA_HOME and Path.

JAVA_HOME: your JDK path (my java home path looks like this: C:\Program Files\Java\jdk1.8.0_231)

Path :you Bin path (my java path looks like this: C:\Program Files\Java\jdk1.8.0_231\bin)

Testing: use Java -version from the command prompt whether this setting works or not. If everything works, you will get java version, otherwise you will get "java is not recognized as ....."

>> Download your Salesforce CLI and execute the .exe file

https://developer.salesforce.com/tools/sfdxcli

Testing: From the command prompt type "SFDX". If it is properly installed, you will get some sfdx commands, otherwise you will get "sfdx is not recognized as ....."

>> Download your Visual studio code from the below link and then execute the .exe file

https://code.visualstudio.com/

>> Now add the extensions whichever necessary.


How to connect to the Salesforce org: 

>> From the visual studio, select proper folder where you want to store all the project related components.

>> Now, press ctrl+shift+p and select SFDX:create project with manifest and then select standard project template ( this step will not really connect to salesforce org but below step connects)

>> Now, press ctrl+shift+p and select SFDX: authorize an org (select login.salesforce.com or test.salesforce.com or custom domain, it depends on which instance you

are connecting)

>>Now right click on lwc(it can be any component like class, aura component pages... so on)

>> provide the webcomponent name and select folder and then hit enter.

>> Now your webcomponets files are availble under the folder in the format of .html, .js and meta xml

>>Right click once you develop your component and deploy it.


LWC open source:

Go to  : https://lwc.dev/

=> Download node Js from the below link and execute it:

https://nodejs.org/en/

=> Now go to command prompt follow below steps.

To install Lightning Web Components and the Lightning Web Components CLI, use the open source create-lwc-app tool.

Step 1: npx create-lwc-app my-app   ( here my-app can be any name. If you change it as per your needs, ensure to point the below cmd to the right folder
        which you have created)

Note: if the node js in not installed, it will throw an error like "npx is not recognised as internal command..........".

Step 2: cd my-app (to move to the current folder which you have created in the step 1)

Step 3: npm run watch (to start your local server)


As a final step, now go to the local host from any browser: http://localhost:3001


Push the same code to the Heroku cloud:

Signup for the Heroku account for free from the below link:

https://signup.heroku.com

=> Install "GIT" prior to installing Heroku cli, use the below link for the same.

https://git-scm.com/download/win

Testing: from command prompt type git, if it is installed properly, you will get proper commands.

=> Install Heroku cli from below website:

https://devcenter.heroku.com/articles/heroku-cli

Testing: from command prompt type "Heroku",  if it is installed properly, you will get proper commands.

Create a Procfile with web: npm run serve and place the file under root folder of where you created your opensource(my-app) folder.

heroku login

git init (initializes git if it is not initialized)

git add .
git commit -m "Intial Commit"
git push heroku master
heroku open

Note: To connect to specific existing app you can use cmd heroku git:remote -a lwconcloud


TIP: In case if you encounter any challenges to connect to heroku from your local code.

you can download below git stuff from the given link and push to the heroku. You can change the folder structure as per your needs.

https://github.com/Tdssaini/lwc-open-source-with-heroku

>> now go to the app which you have in Heroku and try to check the output.

Wednesday, February 19, 2020

Governor Limits Using Workbench

  • Login to Workbench.
  • On the Jump to picklist select "REST Explorer"
  • Click "Select"
  • From the options presented select: /services/data/v47.0/limits. (change to your latest version)
  • Click "Execute"
Open the required governor limits folder that you want to check.