Monday, April 27, 2020

pubsub in LWC

If we remember the Aura framework, to communicate between two unknown components we used the Application event. There is no such event in lwc instead an alternate is pubsub module.

copy the pubsub code from the below link and create a lwc service component with the name lwc.

https://github.com/trailheadapps/lwc-recipes/blob/master/force-app/main/default/lwc/pubsub/pubsub.js


From the above module, keep a special eye on registerListener,fireEvent and unregisterListener functions.

export {
    registerListener,
    unregisterListener,
    unregisterAllListeners,
    fireEvent
};


In the publisher component we use fireEvent and from the subscriber component, we use registerListener and unregisterListener. Both publisher and subscriber share these functions and hence we are calling it as pubsub module.

Below is the simple and easy code to understand this concept.

publishercmp.html

<template>
    <lightning-card  title="I'm a publisher">
        <lightning-layout>
           <lightning-layout-item padding="around-small">
            <lightning-button label="Publisher" onclick={fireevent}></lightning-button>
           </lightning-layout-item>
       </lightning-layout>
      
    </lightning-card>
    
</template>

publishercmp.js

import { LightningElementwire } from 'lwc';
import {fireEventfrom 'c/pubsub';
import { CurrentPageReference } from 'lightning/navigation';

export default class MyPublisher extends LightningElement {

@wire(CurrentPageReferencepageRef;

fireevent(){
 fireEvent(this.pageRef"supplyme","from publisher");
}
}


subscriber.html

<template>
    <lightning-card title="I'm a Subscriber">
        <lightning-layout>
            <lightning-layout-item>
                {datafrompub}
            </lightning-layout-item>
        </lightning-layout>
    </lightning-card>
</template>

subscriber.js

import { LightningElementwire } from 'lwc';
import { CurrentPageReference } from 'lightning/navigation';
import {registerListener,unregisterAllListenersfrom 'c/pubsub';

export default class MySubscriber extends LightningElement {

    @wire(CurrentPageReferencepageRef;
    datafrompub;

    connectedCallback(){ registerListener("details",this.getdata,this);}

    disconnectedCallback(){ unregisterAllListeners(this);}

    getdata(pubdata){

    this.datafrompub=pubdata;

    }

}


Here is the output after clicking the button in the publisher component.


Thanks.


Loadstyle, Loadscript in LWC

Import static resources from the @salesforce/resourceUrl scoped module. Static resources can be archives (such as .zip and .jar files), images, style sheets, JavaScript, and other files.

Below is the sample example for the same:

import { LightningElement } from 'lwc';
import img  from '@salesforce/resourceUrl/benioff';
export default class Singletonex extends LightningElement {

imagebenioff=img;
}
}
<template>
<button onclick={checkfunctions} class="button">custom script from different component </button>
    <div class="slds-m-around_medium">
    <img src={imagebenioff}>
    </div>
</template>


Download any pic which can be archives (such as .zip and .jar files), images, style sheets, JavaScript, and other files. Here I downloaded the Mark Benioff pic to remember the boss of Salesforce :)

Working with an image is straight forward, how about custom CSS and external libraries?

To do this first include the below statement and then include the path of the resource which you want to use.

import {loadStyle,loadScriptfrom 'lightning/platformResourceLoader';

To map this with your existing aura knowledge loadStyle and loadScripts are as similar as below code.

<aura:component>
    <ltng:require
        styles="{!$Resource.jsLibraries  + '/styles/jsMyStyles.css'}"
        scripts="{!$Resource.jsLibraries + '/jsLibOne.js'}"
        afterScriptsLoaded="{!c.scriptsLoaded}" />
</aura:component>
Here loadStyle and loadScript are promises, use promise notations to utilize these resources.

Below is the simple defined example to understand this concept better.

markup:

<template>

    <button onclick={checkfunctions} class="button">custom script from different component </button>
    <div class="slds-m-around_medium">
    <img src={imagebenioff}>
    </div>
</template>

import { LightningElement } from 'lwc';
import img  from '@salesforce/resourceUrl/benioff';
import {loadStyle,loadScriptfrom 'lightning/platformResourceLoader';

import jsurl from '@salesforce/resourceUrl/customjs';
import storageresource from '@salesforce/resourceUrl/storage';
import cssex  from '@salesforce/resourceUrl/customcss';

export default class Singletonex extends LightningElement {

imagebenioff=img;
connectedCallback(){

    Promise.all([loadScript(this,storageresource),loadScript(this,jsurl),
    loadStyle(this,cssex)]).then().catch();

}

checkfunctions(){
    console.log("@@@@@@ Fruits @@@@@@@@@"+_map.getFruits());
    
    console.log("@@@@@@ shared component counter @@@@@@@@@"+counter.increment());
    console.log("@@@@@@ shared component counter@@@@@@@@@"+counter.getValue());


}


}


Below are the resources to include in the static resources.

customcss (ensure that to save it with .css extension)

.button {
  background-color: #4CAF50;
  border: none;
  color: white;
  padding: 15px 32px;
  text-align: center;
  text-decoration: none;
  display: inline-block;
  font-size: 16px;
  margin: 4px 2px;
  cursor: pointer;
}


customjs (ensure that to save it with .js extension)

window._map = (function() {
    var fruits = ["Mango", "Apple", "Banana", "Graps", "Pineapple"];
    return {
        getFruits: function() {
            return fruits;
        }
    };
}());

storagejs (ensure that to save it with .js extension)


window.counter = (function(){

    var value = 0; // private

    return { //public API
       
        increment: function() {
            value = value + 1;
            return value;
        },

        getValue: function() {

            return value;
        }
       
    };

}());

The above storage code acts as a singleton pattern. Results are persistent across multiple components on the same page. If more than one component are using same code on the same page. The state will be carried forward.  Ex: In component 1 when you click the button count will be 1 and when you click the similar button to call the same code in the other component, the count will be carried forward. Now the count will be 2 and so on.....


Saturday, April 25, 2020

Call apex from LWC.


We know that we can import modules into the LWC javascript like "import { LightningElement,track,api } from 'lwc';"

Lightning web components can also import methods from Apex classes. The imported methods are functions that the component can call either via @wire or imperatively.

I divided into two categories they are wire and imperative.

Category one :  via wire.

>> We can wire a property to the method which you imported from apex class.
 @wire(getContactList) contacts;

Here we are wiring a function to property contact. Now, this property contains two sets of data. one is data ex:"contacts.data" another one error ex: is "contacts.error".

In the markup, we can access data and error as below.

<template if:true={contacts.data}>
                <template for:each={contacts.data} for:item="contact">
                    <p key={contact.Id}>{contact.Name}</p>
                </template>
            </template>
            <template if:true={contacts.error}>
                <c-error-panel errors={contacts.error}></c-error-panel>
            </template>
>> We can wire a function to the method which you imported from apex class.
@wire(getContactList)
    wiredContacts({ error, data }) {
        if (data) {
            this.contacts = data;
            this.error = undefined;
        } else if (error) {
            this.error = error;
            this.contacts = undefined;
        }
    }
From the mark up only change is, instead of referring it like {contacts.data}, we need to refer {contacts}.

Example:
                <template for:each={contacts} for:item="contact">
                    <p key={contact.Id}>{contact.Name}</p>
                </template>
            </template>


Category two:  Call an Apex Method Imperatively.


Apex methods that are annotated with cacheable=true are restricted to read-only operations. They perform better, so use cacheable methods when possible. You can access cacheable Apex methods with @wire or call them imperatively. Call a method imperatively when you must control when the invocation occurs (for example, in response to clicking a button, or to delay loading to outside the critical path). When you call a method imperatively, you receive only a single response. Compare this behavior with @wire, which delegates control to the framework and results in a stream of values being provisioned. Whether you use @wire or call a method imperatively, the data is stored in the Lightning Data Service cache.

In the following scenarios, you must call an Apex method imperatively as opposed to using @wire.

To call a method that isn’t annotated with cacheable=true, which includes any method that inserts, updates, or deletes data.
To control when the invocation occurs.
To work with objects that aren’t supported by User Interface API, like Task and Event.

To call a method from an ES6 module that doesn’t extend LightningElement

upon clicking the button below method will get call which in turn call the getContactList. unlike wire mechanism, here we need to use promises like .then and .catch.
handleLoad() {
        getContactList()
            .then(result => {
                this.contacts = result;
            })
            .catch(error => {
                this.error = error;
            });
    }

You don't need to use @wire here.


To pass params you just need to mention params with in the brackets of the method.

getContactList({ amount: this.amount });

Monday, April 20, 2020

LWC Child to parent, grand parent communication with bubble event.

Create and Dispatch Events

Create and dispatch events in a component’s JavaScript class. To create an event, use the constructor. To dispatch an event, call the EventTarget.dispatchEvent() method.
The CustomEvent() the constructor has one required parameter, which is a string indicating the event type. As a component author, you name the event type when you create the event. You can use any string as your event type. However, we recommend that you confirm with the DOM event standard.

Communicate from child to grand parent.
Child.html
<template>
      <button onclick={updateparent} >Update Prnt and Grand Parent</button>
  
</template>

Child.js
import { LightningElement,apifrom 'lwc';

export default class Child extends LightningElement {

    @api recordData;

    updateparent(){
    this.dispatchEvent(new CustomEvent('updateme',
    {bubbles: true,composed: true,detail:"John"}

     ));
    }

  
}

parent.html
<template>

<my-child record-data={objdata}  onupdateme={prntfun}></my-child>
<
</template>

parent.js
import { LightningElementtrackfrom 'lwc';

export default class Prnt extends LightningElement {


@track objdata=[

{"firstname":"Mark""lastname":"Paul"
"Picture":"https://techcrunch.com/wp-content/uploads/2019/08/Screen-Shot-2019-08-29-at-3.02.46-PM.png?w=1390&crop=1"     },
{"firstname":"Jennie""lastname":"Paul",
 "Picture":"https://techcrunch.com/wp-content/uploads/2019/08/Screen-Shot-2019-08-29-at-3.02.46-PM.png?w=1390&crop=1"     }
];


prntfun(event){

    console.log("###evnt detail####"+event.detail)

   this.objdata[0].lastname=event.detail;


}
}

grandParent.html
<template>
   
   <my-prnt  onupdateme={gpfun}> ></my-prnt>
  
</template>

when you dispacth the event with bubbles:true and composed:true, you can use the same syntax as what you used in the parent component. Notice that onupdateme={gpfun}(Grand parent) and onupdateme={prntfun}(Parent) both are same in parent and grandparent.The only change is the function name, rest everything is same.
grandParent.js
import { LightningElementfrom 'lwc';

export default class Gp extends LightningElement {

    gpfun(){

  console.log("#####Grand parent is called$$$$$$$");

    }

}

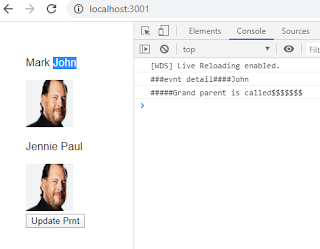
Before clicking the button the output is as below.


Now after clicking "Update Prnt" , the Name of the Mark paul changes to Mark John, this updation is being done in the parent and passing back the data back to the child.

Even though we need not to use @track from the spring 20 release, there is one place that you need to use that is updating the fields of the objects. This example is the perfect suite of when you need to use @track. If you remove @track in the parent component child component will not reflect the name "John".
Below is the output which explains both child to parent and child to the grandparent. This approach will bubble up to the dom element until it reaches the first invocation of the dom hierarchy.


Notice Grand parent is called is basically coming from the grand parent. Initiation taking place from the child web component.
Thanks !


Slots in LWC

Add a slot to a component’s HTML file so a parent component can pass markup into the component. A component can have zero or more slots.
A slot is a placeholder for markup that a parent component passes into a component’s body. 
To define a slot in markup, use the <slot> tag, which has an optional name attribute.
Below analogy between aura components and web components would give a clear picture of slots.

In the aura component, you used facets and body attribute to received data in the component body and now we are using slots to get it done.
In the below code we placed the content in the body of a child but to see the output we need to specify {!v.body} in the markup or you need to use body attribute in the javascript and parse it and supply it to the markup.
Parent cmp: 
<aura:application >
    <!--no logic in any of the bundle files -->
    <c:childbody >
        Parent data 1..
    </c:childbody>
</aura:application>
childbody cmp:
<aura:component >
    <!--no logic in any of the bundle files -->
{!v.body}
</aura:component>
Below code explains Slots of web components.
Parent webcmp:
<template>
  <!-- I dont have any business logic in the javascript, so ignoring it-->

  <my-childslot>
   <p>From the parent, we are passing data </p>

   <span slot="f1">Parent span </span>

   <div slot="f2">Parent f2 span </div>
  </my-childslot>

</template>

childbody.html webcmp:
<template>

<slot></slot>

<b><slot name="f1">   </slot> </b>
<h1><slot name="f2">   </slot> </h1>

</template>

childbody.js webcmp
import { LightningElementtrackfrom 'lwc';

export default class Childslot extends LightningElement {
    renderedCallback(){
   // Below line will not work as span element is not there in its template
   // console.log("$$$span query selector$$$$"+this.template.querySelector('span').innerHTML);
    
   //Below code works by removing template.
   console.log("$$$span query selector$$$$"+this.querySelector('span').innerHTML);

    }

}

The output of web component as follows:
To access the elements passed into the childbody, you need to use syntax as below. Note you should not use this.template while accessing the elements passed via slot.
this.querySelector('anyelement')